IM Dashboard
The IM Dashboard is a graphical interface to access REST APIs of IM Server specially developed to EOSC users to access EGI Cloud Compute resources.
Functionalities:
OIDC authentication
Display user’s infrastructures
Display infrastructure details, template and log
Delete infrastructure
Create new infrastructure
The im-dashboard is a Python application built with the Flask microframework; Flask-Dance) is used for Openid-Connect/OAuth2 integration.
The docker image uses Gunicorn as WSGI HTTP server to serve the Flask Application.
How to deploy the dashboard
Register a client in an OIDC server with the following properties:
redirect uri: https://<DASHBOARD_HOST>:<PORT>/login/oidc/authorized
scopes: ‘openid’, ‘email’, ‘profile’, ‘offline_access’ (‘entitlements’ in EGI Check-In optional)
introspection endpoint enabled
Create the config.json file (see the [example](app/config-sample.json)) setting the following variables:
Parameter name |
Description |
Mandatory (Y/N) |
Default Value |
|---|---|---|---|
OIDC_CLIENT_ID |
OIDC client ID
|
Y |
N/A |
OIDC_CLIENT_SECRET |
OIDC client Secret
|
Y |
N/A |
OIDC_BASE_URL |
OIDC service URL
|
Y |
N/A |
OIDC_GROUP_MEMBERSHIP |
List of OIDC groups to be checked for allowing access
|
N |
[] |
OIDC_SCOPES |
OIDC scopes
|
Y |
N/A |
TOSCA_TEMPLATES_DIR |
Absolute path where the TOSCA templates are stored
|
Y |
N/A |
TOSCA_PARAMETERS_DIR |
Absolute path where the TOSCA parameters are stored
|
Y |
N/A |
IM_URL |
Infrastructure Manager service URL
|
Y |
N/A |
SUPPORT_EMAIL |
Email address that will be shown in case of errors
|
N |
“” |
EXTERNAL_LINKS |
List of dictionaries ({ “url”: “example.com” , “menu_item_name”: “Example link”})
specifying links that will be shown under the “External Links” menu
|
N |
[] |
LOG_LEVEL |
Set Logging level
|
N |
info |
DB_URL |
URL to the DB to store dashbaord data
|
N |
sqlite:///creds.db |
ANALYTICS_TAG |
Google Analytic Tag
|
N |
“” |
STATIC_SITES |
List of static sites added to the FedCloudInfo ones. Format:
[{“name”: “static_site_name”, “url”: “static_site_url”, “id”: “static_id”,
“vos”: {“vo”: “stprojectid”}}]
|
N |
[] |
STATIC_SITES_URL |
URL of a JSON file with the list of static sites added to the FedCloudInfo ones
|
N |
“” |
You need to run the IM dashboard on HTTPS (otherwise you will get an error); you can choose between
enabling the HTTPS support
using an HTTPS proxy
Details are provided in the next paragraphs.
Enabling HTTPS
You would need to provide
a pair certificate/key that the container will read from the container paths /certs/cert.pem and /certs/key.pem;
the environment variable ENABLE_HTTPS set to True
Run the docker container:
$ docker run -d -p 443:5001 --name='im-dashboard' \
         -e ENABLE_HTTPS=True \
         -v $PWD/cert.pem:/certs/cert.pem \
         -v $PWD/key.pem:/certs/key.pem \
         -v $PWD/config.json:/app/app/config.json \
         -v $PWD/tosca-templates:/opt/tosca-templates \
         grycap/im-dashboard:latest
Access the dashboard at https://<DASHBOARD_HOST>/
Using an HTTPS Proxy
Example of configuration for nginx:
server {
      listen         80;
      server_name    YOUR_SERVER_NAME;
      return         301 https://$server_name$request_uri;
}

server {
listen        443 ssl;
server_name   YOUR_SERVER_NAME;
access_log    /var/log/nginx/proxy-paas.access.log  combined;

ssl on;
ssl_protocols TLSv1 TLSv1.1 TLSv1.2;
ssl_certificate           /etc/nginx/cert.pem;
ssl_certificate_key       /etc/nginx/key.pem;
ssl_trusted_certificate   /etc/nginx/trusted_ca_cert.pem;

location / {
               # Pass the request to Gunicorn
               proxy_pass http://127.0.0.1:5001/;

               proxy_set_header        X-Real-IP $remote_addr;
               proxy_set_header        X-Forwarded-For $proxy_add_x_forwarded_for;
               proxy_set_header        X-Forwarded-Proto https;
               proxy_set_header        Host $http_host;
               proxy_redirect          http:// https://;
               proxy_buffering         off;
}

}
Run the docker container:
$ docker run -d -p 5001:5001 --name='im-dashboard' \
         -v $PWD/config.json:/app/app/config.json \
         -v $PWD/tosca-templates:/opt/tosca-templates \
         grycap/im-dashboard:latest
Warning!! Remember to update the redirect uri in the OIDC client to https://<PROXY_HOST>/login/oidc/authorized
Access the dashboard at https://<PROXY_HOST>/
Performance tuning
You can change the number of gunicorn worker processes using the environment variable WORKERS. E.g. if you want to use 2 workers, launch the container with the option -e WORKERS=2 Check the documentation for ideas on tuning this parameter.
Enabling Credentials encryption
To enable the encryption of the Cloud providers credentials (sensitive data), you have to set the CREDS_KEY environment varible with a valid key used to encrypt/decrypt de data. To get a valid one you can use this python code (you will need Cryptography ) library):
from cryptography.fernet import Fernet
key = Fernet.generate_key()
print(key.decode())
TOSCA Template Metadata
The IM dashboard can exploit some optional information provided in the TOSCA templates for rendering the cards describing the type of applications/services or virtual infrastructure that a user can deploy.
In particular, the following tags are supported:
Tag name |
Description |
description |
Used for showing the card description
|
metadata.display_name |
Used for the card title. If not pro
|
metadata.icon |
Used for showing the card image. If no image URL is provided,
the dashboard will load this icon.
|
metadata.display_name |
Used for the card title. If not provided, the template name will be used
|
metadata.tag |
Used for the card ribbon (displayed on the right bottom corner)
|
Example of template metadata:
tosca_definitions_version: tosca_simple_yaml_1_0

imports:
- indigo_custom_types: https://raw.githubusercontent.com/indigo-dc/tosca-types/v4.0.0/custom_types.yaml

description: Deploy a Mesos Cluster (with Marathon and Chronos frameworks) on top of Virtual machines

metadata:
display_name: Deploy a Mesos cluster
icon: images/mesos.png

topology_template:

....
Usage
The dashbaord of the IM enables non advanced users to manage their infrastructures launching a set of predefined TOSCA templates on top of EGI Cloud Compute resources. The dashboard does not provide all the features provided by the IM service in case you need more advanced features use the IM web interface.
Login
To login the dashbaord the user will use the EGI Checkin OIDC authentication system. Once authenticated, the user will be redirected to the portfolio of available TOSCA templates.
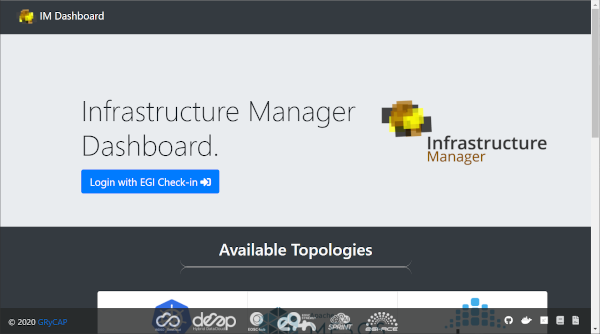
Fig 1. Landing page.
Cloud Credentials
This page enable the user to specify the credentials to access any cloud provider it has access to. In the list (Fig. 2) the user can edit, delete and enable/disable the selected cloud credential.
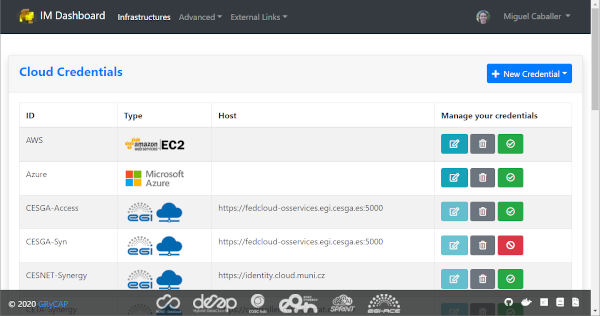
Fig 2. List of Cloud Credentials.
Editing or adding the credentials will show a modal form (Fig. 3) where the user has the ability to specify all the parameters needed to access each cloud provider supported. In particular for EGI Cloud Compute sites sites the user only has to select one of the VOs he is member and one of sites that supports that VO. These dropdown fields are generated using the information available from the sites and the list of VOs the user is member.
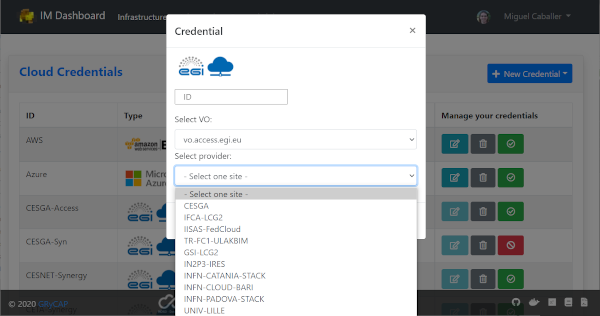
Fig 3. Edit/Add a Credential.
SSH Keys
This page enables the user to add or delete public SSH Keys to be injected to the deployed VMs to allow him to establish a secure connection between his computer and his virtual server(s).
The user can manage a set of SSH Keys that will appear in the SSK Keys list as depicted in Fig. 4. The user can delete the existing SSH Keys from the list or add new ones using the “New SSH Key” Button on the top-right of the page.
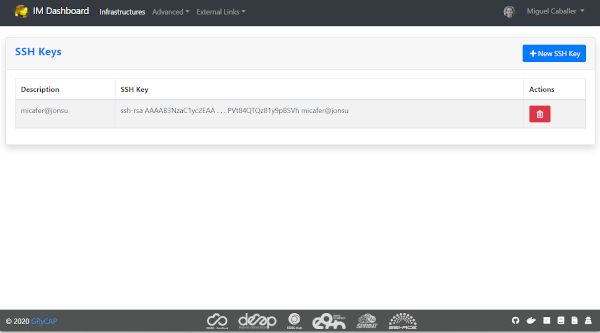
Fig 4. SSH Keys list.
If the “New SSH Key” a new modal form (Fig. 5) will be shown, enabling the user to add a new key, setting a description that will be shown in the list.
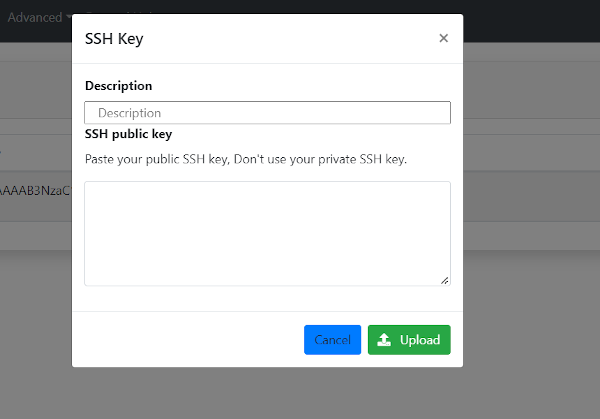
Fig 5. Add a new SSH Key.
TOSCA Templates
The list of available TOSCA templates enable the user to select the required topology to deploy. Each TOSCA template can be labelled by the TOSCA developer with any “tag” that will show a ribbon displayed on the right bottom corner. An special “tag” is the elastic one that are used to mark the templates that are configured to automatically manage the elasticity of the deployed cluster.
The user have to click on the “Configure” button to set the input values of the TOSCA template and also to select the VO, Site and Image to deploy the infrastructure (Fig. 6).
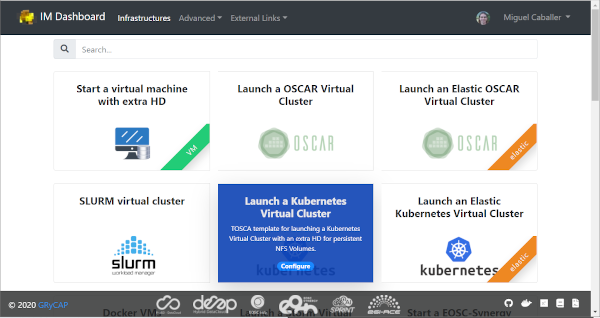
Fig 6. List of TOSCA templates.
Initially the user can set a name to describe the infrastructure to be deployed. It will make easier to list infrastructures. In the firsts tabs the user can introduce the set of input values of the toplogy. By default there is only one tab called “Input Values” (Fig. 7), but the TOSCA developer can add/rename them to make easier the input values selection.
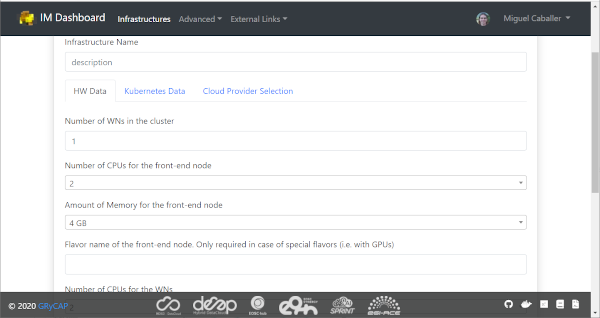
Fig 7. TOSCA input values.
The final tab will be the “Cloud Provider Selection” (Fig. 8). In this tab the user has to select: first, one of the Cloud providers that has been previously added (and not disabled) in the “Cloud Credentials” page, then it has to select the base image used to deploy the VMs. In case of EGI Cloud Compute sites the user has two options, he can select an image from the list of images provided by the EGI FedCloudInfo information system or from the list provided directly by the Cloud site. Other providers will only show a dropdown list with the available images to use. Only in the case of AWS Cloud provider the user has to specify manually the AMI id of the image to use.
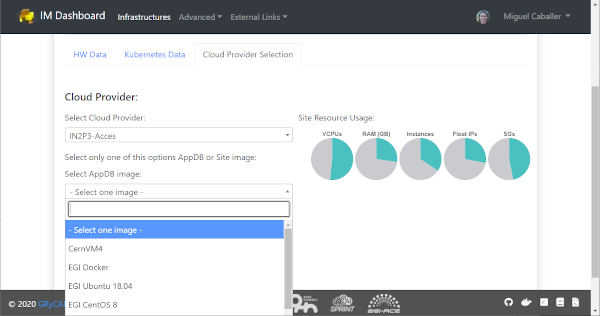
Fig 8. Select Cloud Provider and Image.
Furthermore, this tab will show the ammount of resources available in the selected Cloud provider. The user can easily check the resources available in the selected Cloud provider and if the current deployment will fit in the available resources. The information is shown in a set of pie charts showing the total resources available and the resources used by the current user. Used resources are shown in orange, free ones in grey, the needed resources for the deployment in green or red if they do not fit in the available resources.In case that the amnount of resources used by the user is too high, a message will be shown to the user indicating that the current deployment will not fit in the available resources. (Fig. 9)
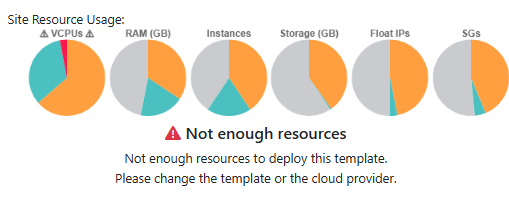
Fig 9. Cloud resources usage.
Infrastructures
This page will show the list of infrastructures deployed by the current user (Fig. 9). The first column shows the name set by the user on infrastructure creation, then shows the ID assinged by the IM service, third column shows the Cloud type where the infrastructure was deployed, next column shows information about the Cloud provider, fifth column shows the current status of the infrastructure, sixth one shows the list of VMs with their IDs and finally appears a button with a set of actions to perform to it (Fig. 10). Columns “Cloud Type” and “Cloud Info” were added in version 2.2.0, infrastructures launched with previous versions will have both columns empty.
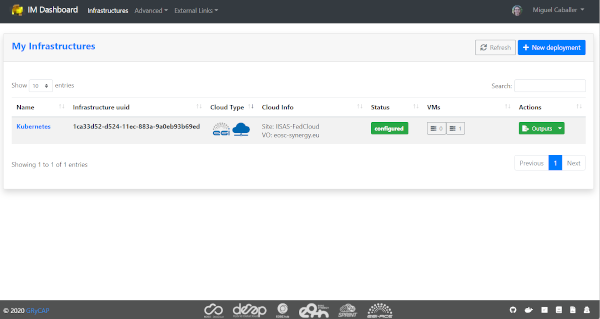
Fig 10. List of infrastructures.
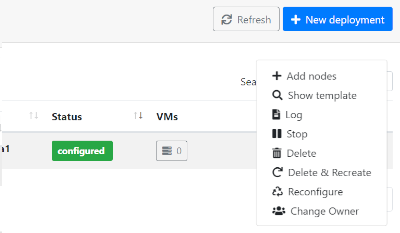
Fig 11. List of infrastructure Actions.
List of Actions:
Add nodes: The Add nodes action enables to add new VMs to the users’ deployment. As depicted in Fig. 11 it will show the list of different types of nodes currently deployed in the infrastructure and the user have to set the number of nodes of each type he wants to deploy. It will also show the image selected to create the VMs (if available). In the dropdown list the user can change the base image, in case that you want to use a new one on the new deployed nodes, or the old one has been removed and you need to select a new one to be able to deploy them.
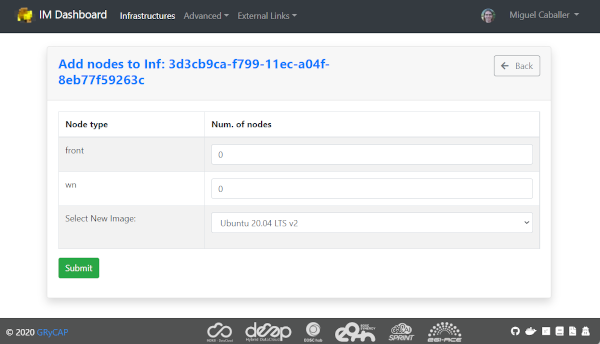
Fig 12. Add nodes page.
Show template: This action shows the original TOSCA template submitted to create the infrastructure.
Log: Shows the error/contextualization log of the infrastructure.
Stop: Stops/Suspends all the VMs of the infrastructure.
Start: Starts/Resume previously stopped infrastructure.
Outputs: Shows the outputs of the TOSCA template. In case of private key of credentials it enables to download it as a file or copy to the clipboard.
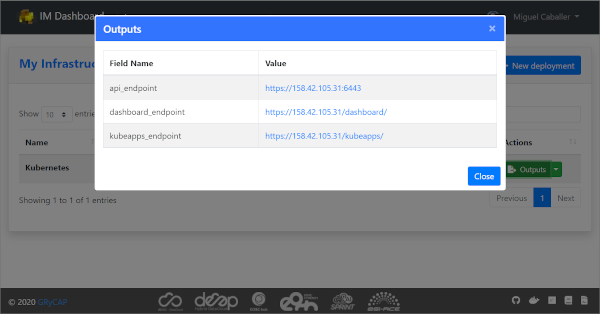
Fig 13. TOSCA outputs.
Delete: Delete this infrastructure and all the asociated resources. It also has the option to “Force” de deletion. In this case the infrastructure will be removed from the IM service even if some cloud resources cannot be deleted. Only use this option if you know what you are doing.
Delete & Recreate: Delete this infrastructure as the previous option, but once it is deleted it will redirect to the infrastructure creation form, with all the input fields filled with the same set of values used to create the deleted infrastructure.
Reconfigure: Starts the reconfiguration of the infrastructure.
Change User: Add or change the ownership of the infrastructure at IM level. Setting an valid share token of other user, the infrastructure can be shared or transfered to another user. If overwrite check is set the new user will be the unique new owner of the infrastructure, otherwise it will be added to the list of current users. If the new user does not have the correct credentials to access the cloud provider where the resources were deployed the user will not be able to manage the cloud resources. To get the share token the user has to go to the infrastructure list page an chlick on the “Token” button. The token will be shown in a modal form and the user can copy it to the clipboard and then share it with the current owner of the infrastructure.
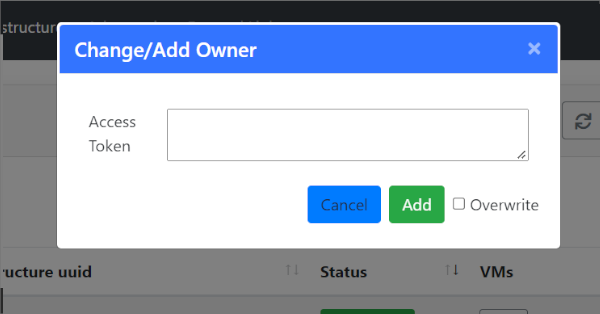
Fig 14. Change/Add User modal form.
VM Info page:
The VM Info page will show all the information about the selected VM and will enable to manage the lifecycle of it. On the top right corner the “Manage VM” dropdown menu will enable: Stop/Start, Reboot, Resize, Reconfigure and Terminate the VM. Furthermore the user can check the error/contextualization log of this particular VM.
The VM infomation is splitted in two dofferent tables, the first one with the main information: State, IPs, HW features and the SSH credentials needed to access it. Second table will show other additional fields.
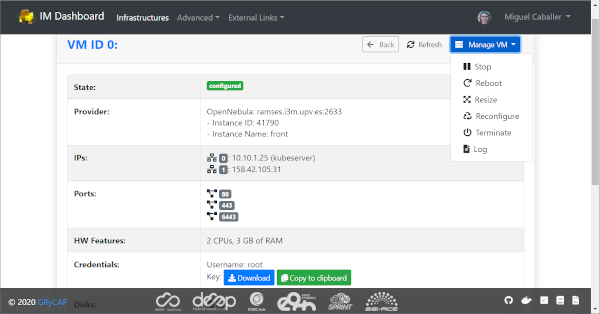
Fig 15. VM Info page.
In case of Resizing the VM the user must provide the new size of the VM in terms of number of CPUs and ammount of memory as show in Fig. 15.
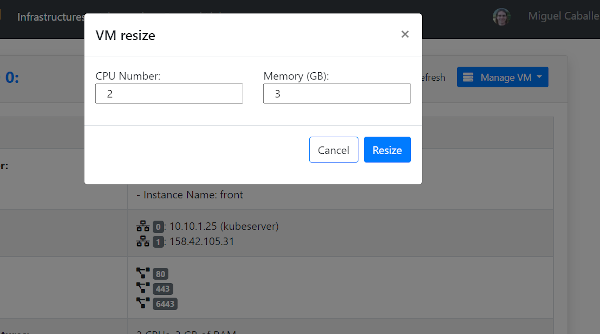
Fig 16. VM Resize modal form.